StratoSort Core — End-to-End Walkthrough
A visual guide to every screen and feature in StratoSort Core, captured from the production Linux AppImage (latest release). Each section maps to one phase of the app workflow.
Platform shown: Ubuntu Linux, AppImage distribution. Launch command: ./StratoSortCore-X.X.X-linux-x86_64.AppImage
Table of Contents
- First Launch & Model Setup
- Welcome Phase
- Setup Phase — Smart Folders
- Discover Phase — File Analysis
- Organize Phase — Review & Execute
- Complete Phase — Summary
- Search & Knowledge OS
- Settings — Full Reference
- Videos
1. First Launch & Model Setup
On first launch, StratoSort checks for AI models in ~/.config/StratoSort Core/models/. If required
models are missing, a setup wizard guides you through downloading them.
Model Selection
The wizard presents installation profiles and lets you choose which models to install:
| Model Type | Purpose | Required? |
|---|---|---|
| Embedding Model (Nomic Embed Text v1.5) | Converts text to vectors for semantic search | Yes |
| Text Analysis Model (Qwen / Llama) | Analyzes documents and generates descriptions | Yes |
| Vision Model (LLaVA) | Analyzes images and screenshots | Optional |
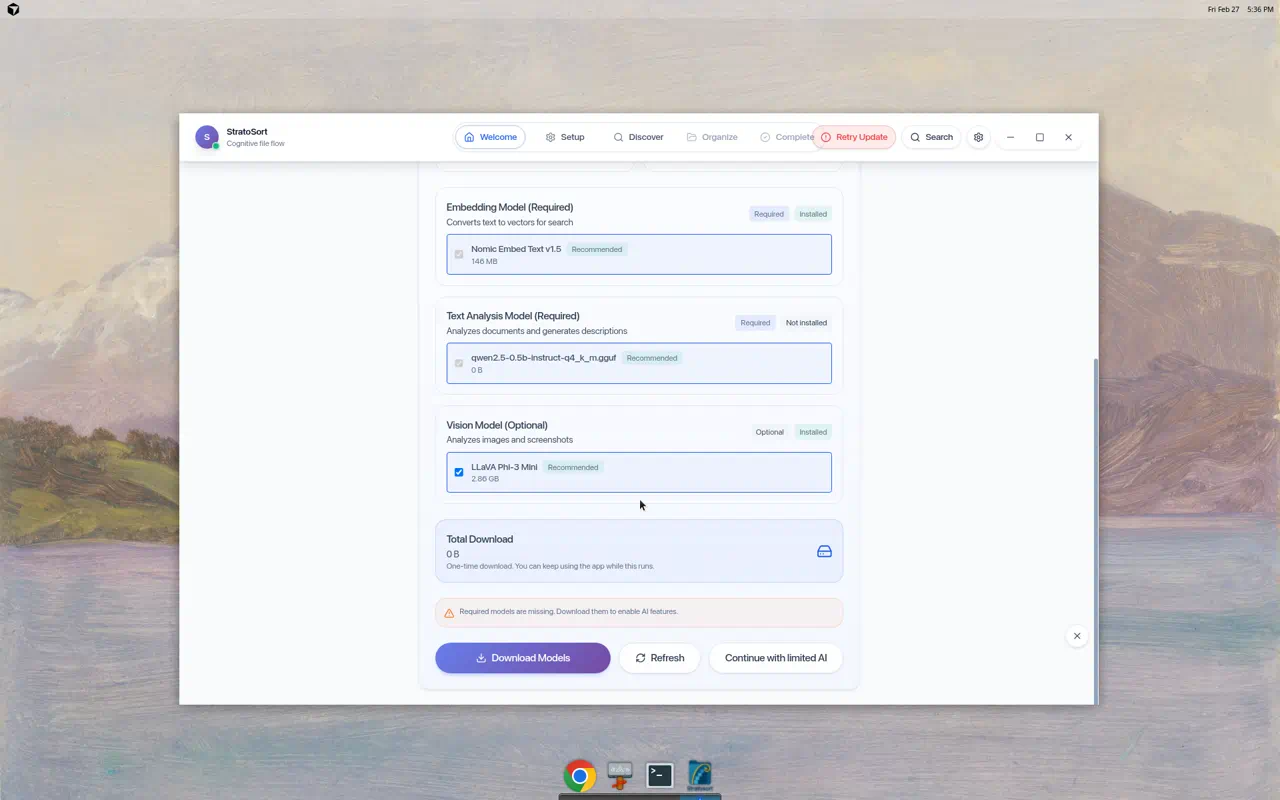
The wizard shows installation status for each model (Installed / Not installed) with download size estimates. Three action buttons are available:
- Download Models — begins downloading selected models
- Refresh — re-checks local model availability
- Continue with limited AI — skips setup and enters the app immediately
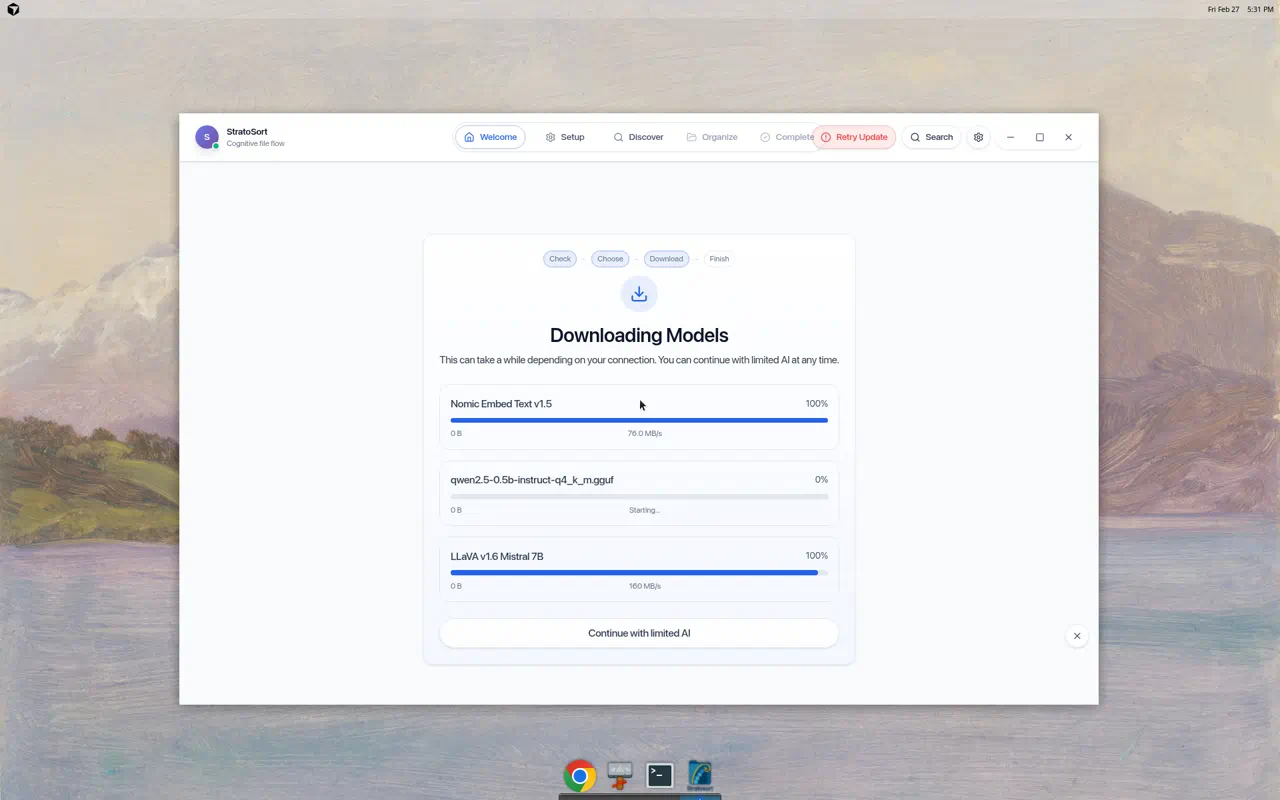
Download Progress
During download, you see per-model progress bars with download speed and completion percentage. You can continue using the app while models download in the background.
2. Welcome Phase
After model setup (or if models are already present), you land on the Welcome screen.

Navigation Bar
The top bar is always visible and contains:
- StratoSort logo with connection status indicator (green = AI engine ready)
- Phase tabs: Welcome → Setup → Discover → Organize → Complete
- Search button — opens the floating search widget / Knowledge OS
- Settings gear — opens the configuration panel
- Window controls — minimize, maximize, close
Welcome Actions
| Action | What It Does |
|---|---|
| Organize files now | Jumps straight to Discover with smart defaults |
| AI & model settings | Opens the Settings panel to the AI Configuration section |
| Configure smart folders | Goes to the Setup phase |
| How does StratoSort work? | Opens a modal explaining the 3-step flow |
How StratoSort Works Modal
Clicking “How does StratoSort work?” reveals the three core steps:
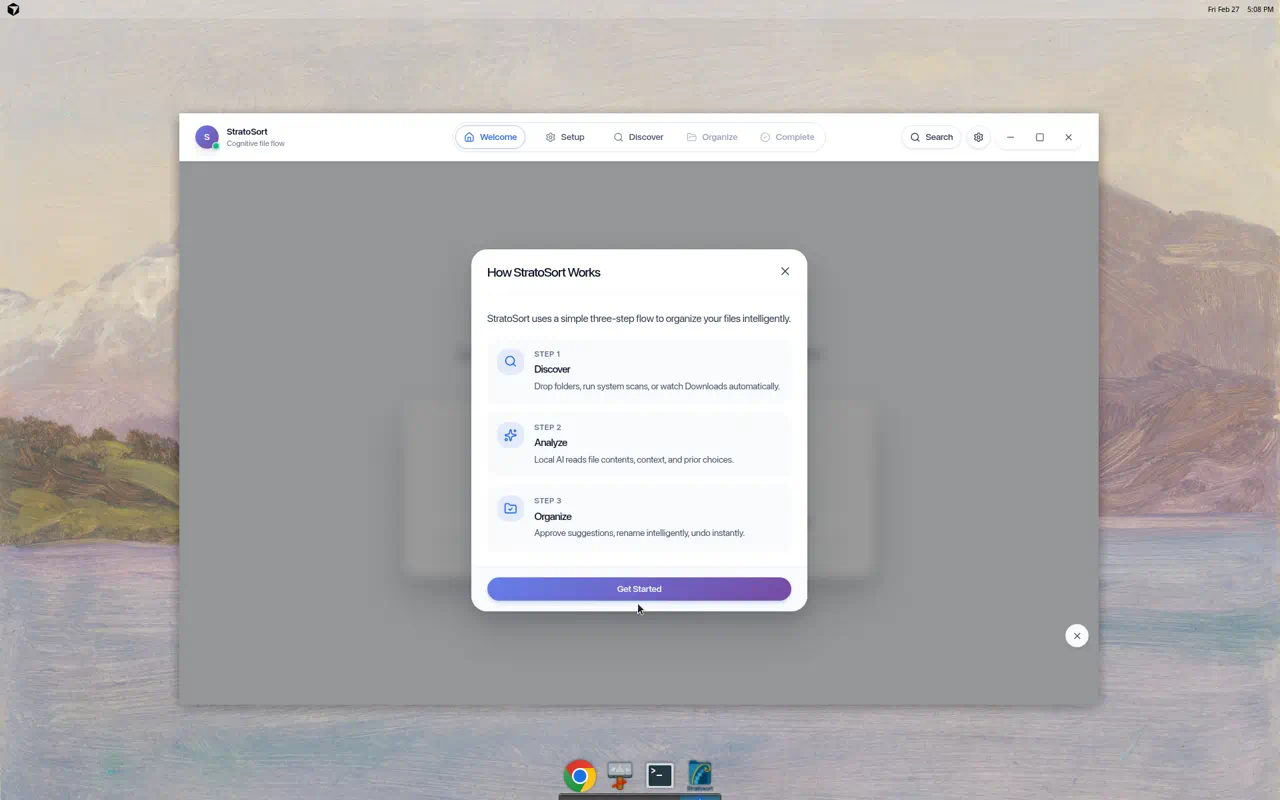
- Discover — Drop folders, run system scans, or watch Downloads automatically
- Analyze — Local AI reads file contents, context, and prior choices
- Organize — Approve suggestions, rename intelligently, undo instantly
3. Setup Phase — Smart Folders
Smart Folders are the destinations the AI uses to organize your files. Each folder has a name, path, and description that the AI reads to decide where files belong.
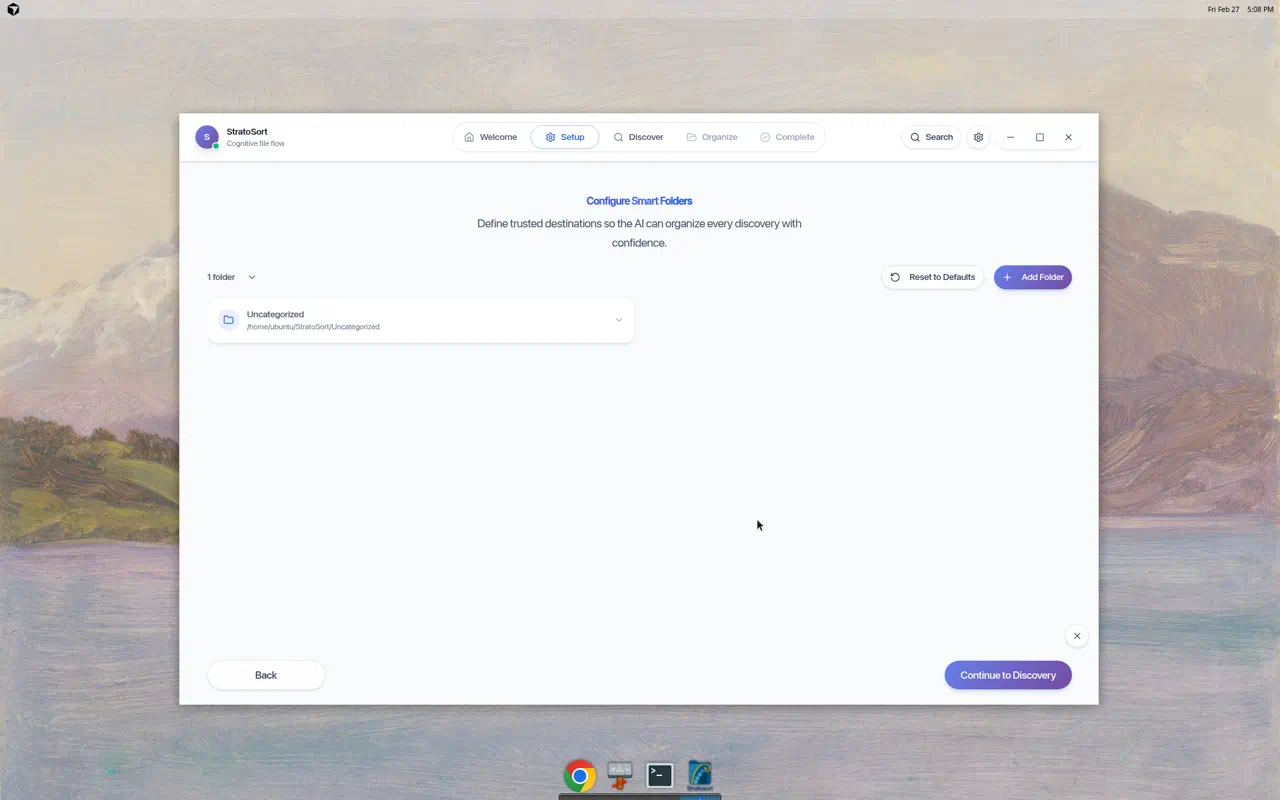
Default Folder
A default “Uncategorized” folder is created at ~/StratoSort/Uncategorized for files that don’t
match any other folder.
Adding a Smart Folder
Click + Add Folder to open the Add Smart Folder dialog:

| Field | Description |
|---|---|
| Folder Name (required) | Display name — e.g., “Invoices”, “Photos”, “Projects” |
| Target Path (optional) | Filesystem path. Auto-fills based on name and default location |
| Description | Plain-language description of what files belong here. The AI uses this to match files. |
The Generate with AI button can auto-create a description based on the folder name.
Tips
- Create folders around real outcomes:
Invoices,Receipts,Screenshots,Contracts - Write descriptions as if telling a coworker what goes in each folder
- You can edit or delete folders anytime
- Reset to Defaults restores the default folder set
- At least one folder is required before continuing
Click Continue to Discovery when finished.
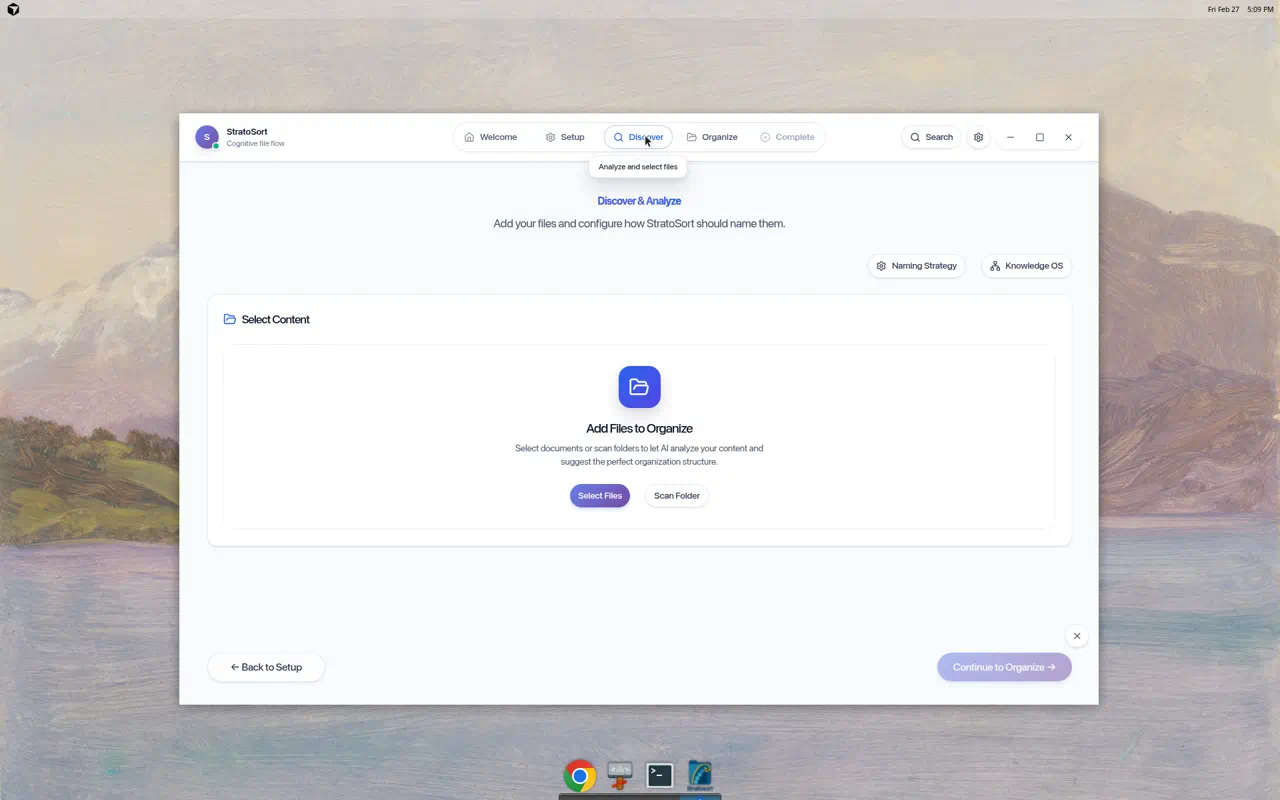
4. Discover Phase — File Analysis
This phase is where you add files for AI analysis. StratoSort reads file contents, extracts meaning, and generates organization suggestions.
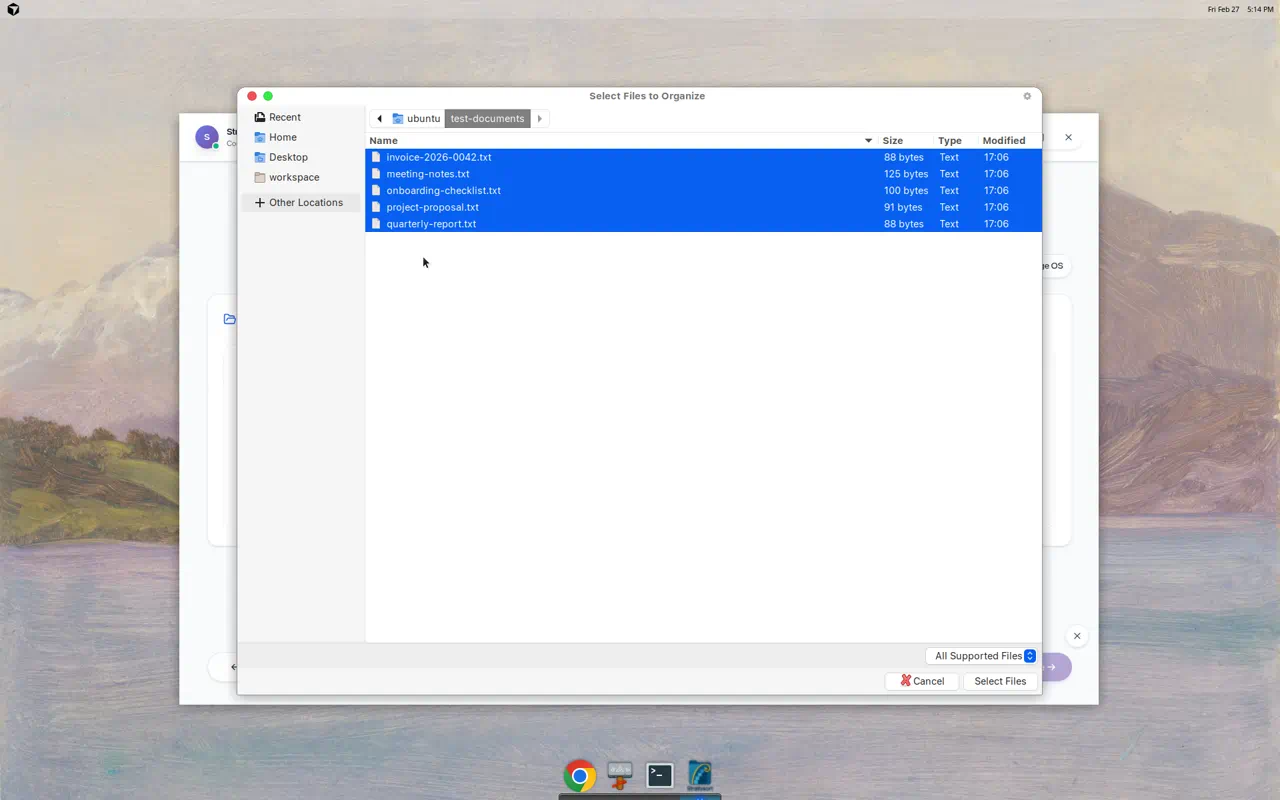
Adding Files
Two methods to add files:
Select Files
Opens a file picker. Navigate to any directory, select individual files or use Ctrl+A to select all, then confirm.
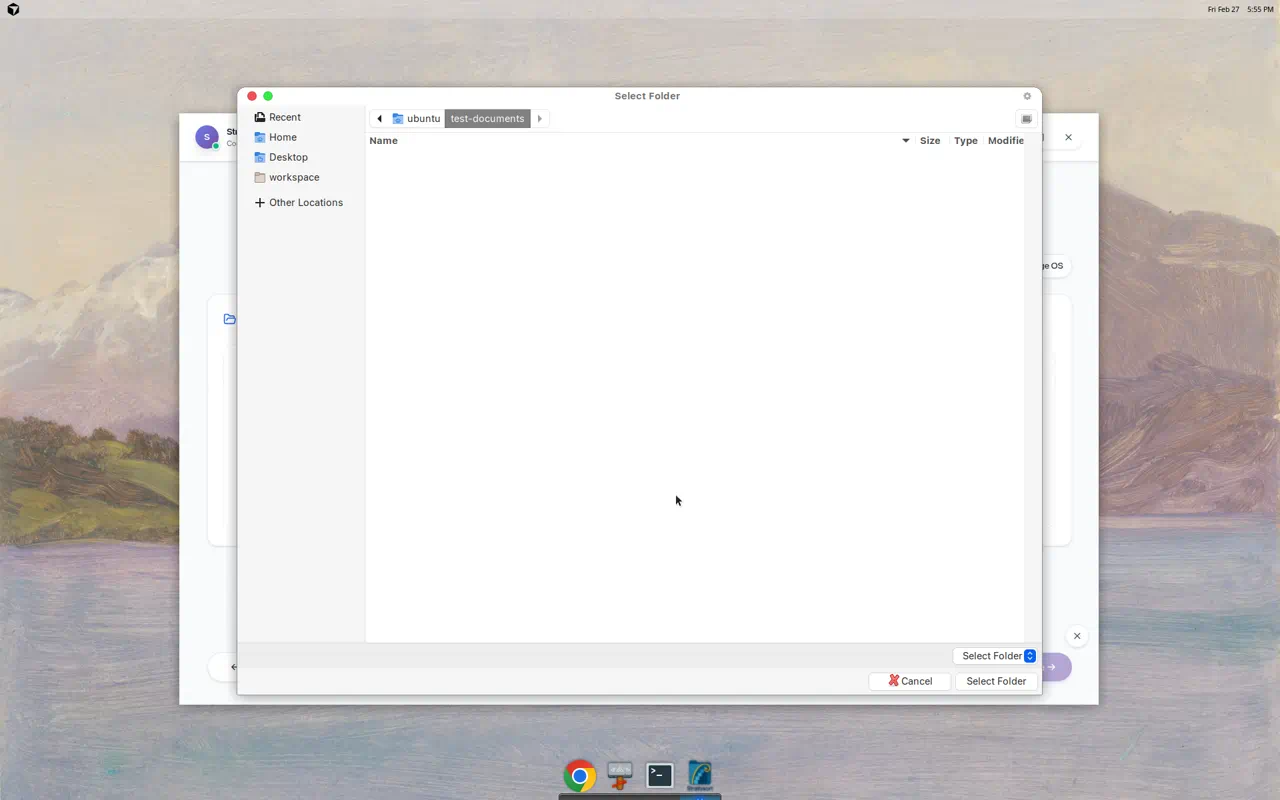
Scan Folder
Opens a folder picker. Select any directory and StratoSort automatically discovers all supported files within it.
Analysis Progress
Once files are added, AI analysis begins automatically:
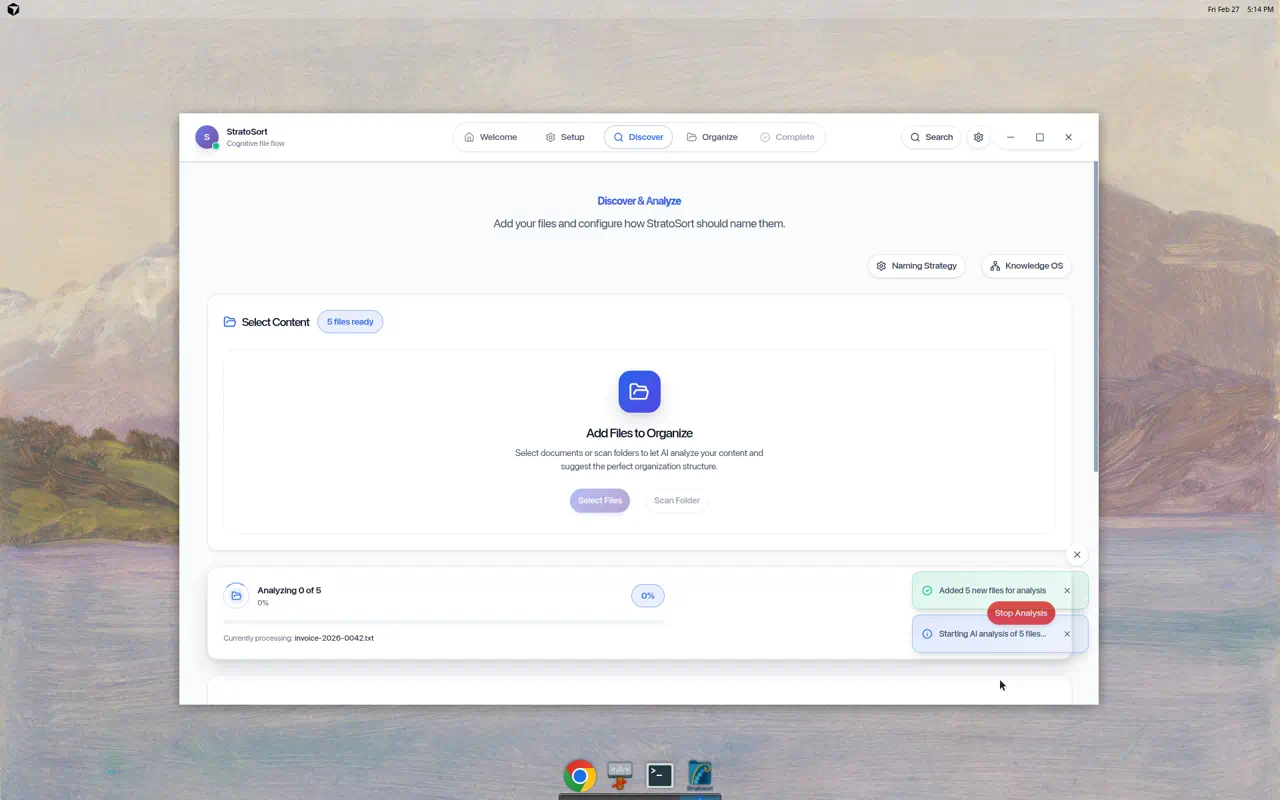
The progress bar shows:
- File counter — “Analyzing X of Y” with percentage
- Current file — which file is being processed
- Stop Analysis button — halt processing at any time
Toast notifications confirm actions:
- “Added N new files for analysis”
- “Starting AI analysis of N files…”
Analysis Complete
When analysis finishes, a completion banner appears with:
- Green status dot with “Analysis complete · 5 ready”
- Toast notification: “Analysis complete! 5 files ready”
- Results summary: “5 successful, 0 failed”
- Clear Queue button to reset
The app automatically advances to the Organize phase once analysis is done.
Naming Strategy
Click Naming Strategy in the upper right to configure how files are renamed:
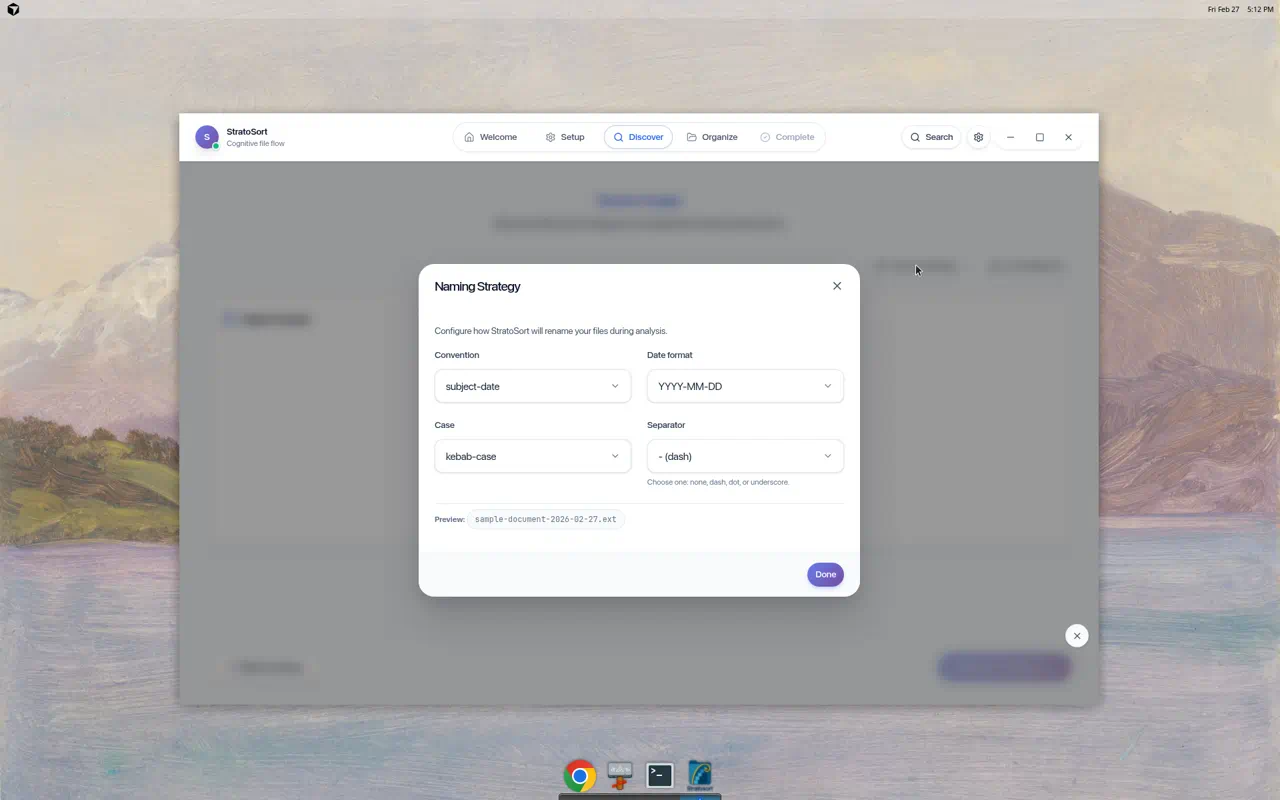
| Setting | Options | Default |
|---|---|---|
| Convention | subject-date, date-subject, subject-only | subject-date |
| Date Format | YYYY-MM-DD, MM-DD-YYYY, DD-MM-YYYY | YYYY-MM-DD |
| Case | kebab-case, snake_case, camelCase, Title Case | kebab-case |
| Separator | dash, dot, underscore, none | dash |
A live Preview shows the resulting filename format.
Knowledge OS Panel
Click Knowledge OS to open the semantic search and relationship panel:
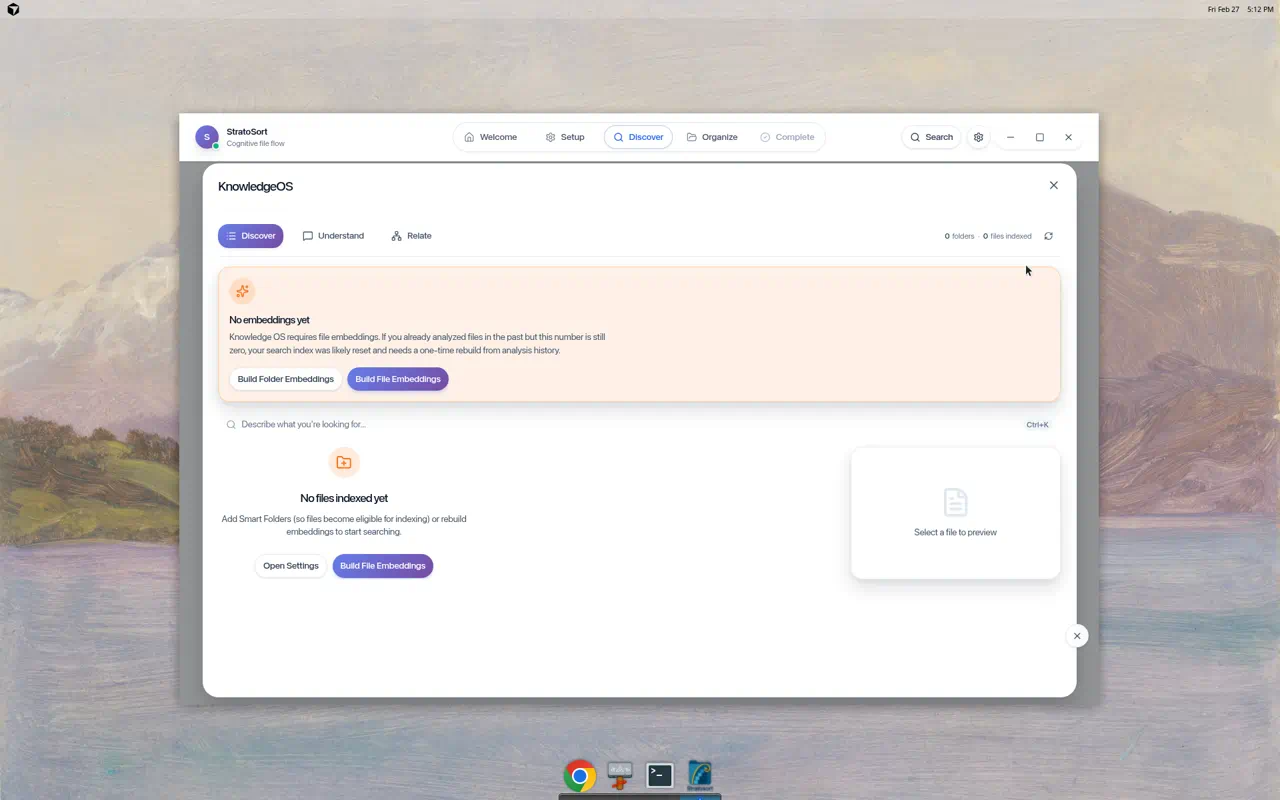
Three tabs are available:
- Discover — Search your files using natural language
- Understand — View document summaries and extracted concepts
- Relate — Explore relationships between files via the Knowledge Graph
The panel requires file embeddings. Click Build File Embeddings to generate the vector index from your analysis history.
5. Organize Phase — Review & Execute
After analysis, the Organize phase shows AI-generated suggestions for each file. You review and approve where each file should be moved and what it should be renamed to.
Note: The Organize tab is only accessible after files have been analyzed in the Discover phase. Navigation is enforced — the tab shows a count badge and a tooltip explaining why it may be disabled.
File Grid with AI Suggestions
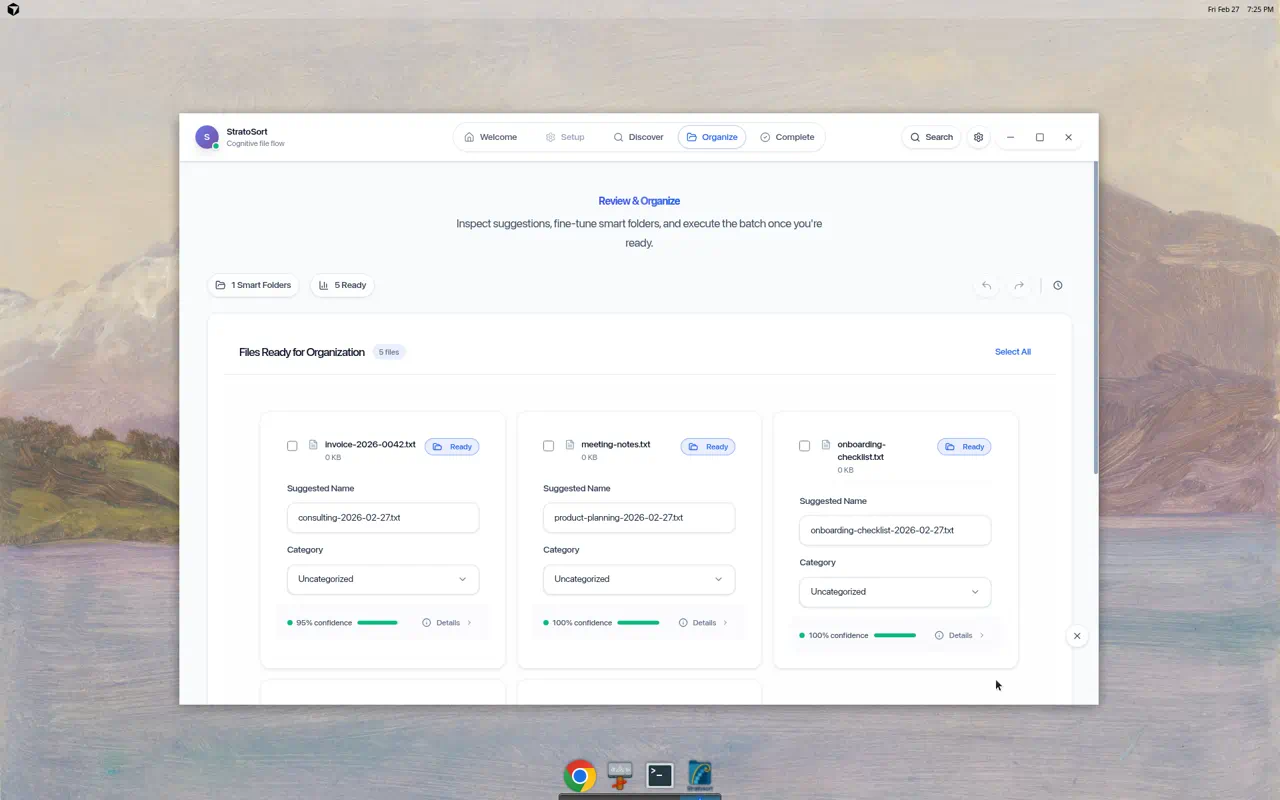
Each file card shows:
- Original filename with “Ready” badge
- Suggested Name — AI-generated filename following your naming convention
- Category dropdown — editable destination folder
- Confidence level — color-coded percentage (green = high)
- Details link — view the full AI analysis
Example AI suggestions from a real analysis:
| Original File | Suggested Name | Confidence |
|---|---|---|
| invoice-2026-0042.txt | consulting-invoice-2026-02-27.txt | 100% |
| meeting-notes.txt | product-plan-session-notes-2026-02-27.txt | 95% |
| onboarding-checklist.txt | onboarding-checklist-2026-02-27.txt | 100% |
Batch Operations
Click Select All to check all files, then use:
- Approve Selected — Accept AI suggestions for all selected files
- Bulk Edit — Change category or name pattern for multiple files at once
- Deselect All — Clear the selection
Additional Features
- Status Overview — Summary modal showing ready/pending/conflict counts
- Conflict Detection — Highlights files with duplicate destination paths
- Execute Organization — Moves and renames files according to approved suggestions
- Undo/Redo — Full undo history for all organization operations
- Processed Files — History of already-organized files
6. Complete Phase — Summary
After executing organization, the Complete phase shows a summary of:
- Total files organized
- Destination folders used
- Any errors or conflicts encountered
- Option to start a new session or undo recent changes
7. Search & Knowledge OS
Search Widget
Click the Search button in the navigation bar to open the floating search widget:
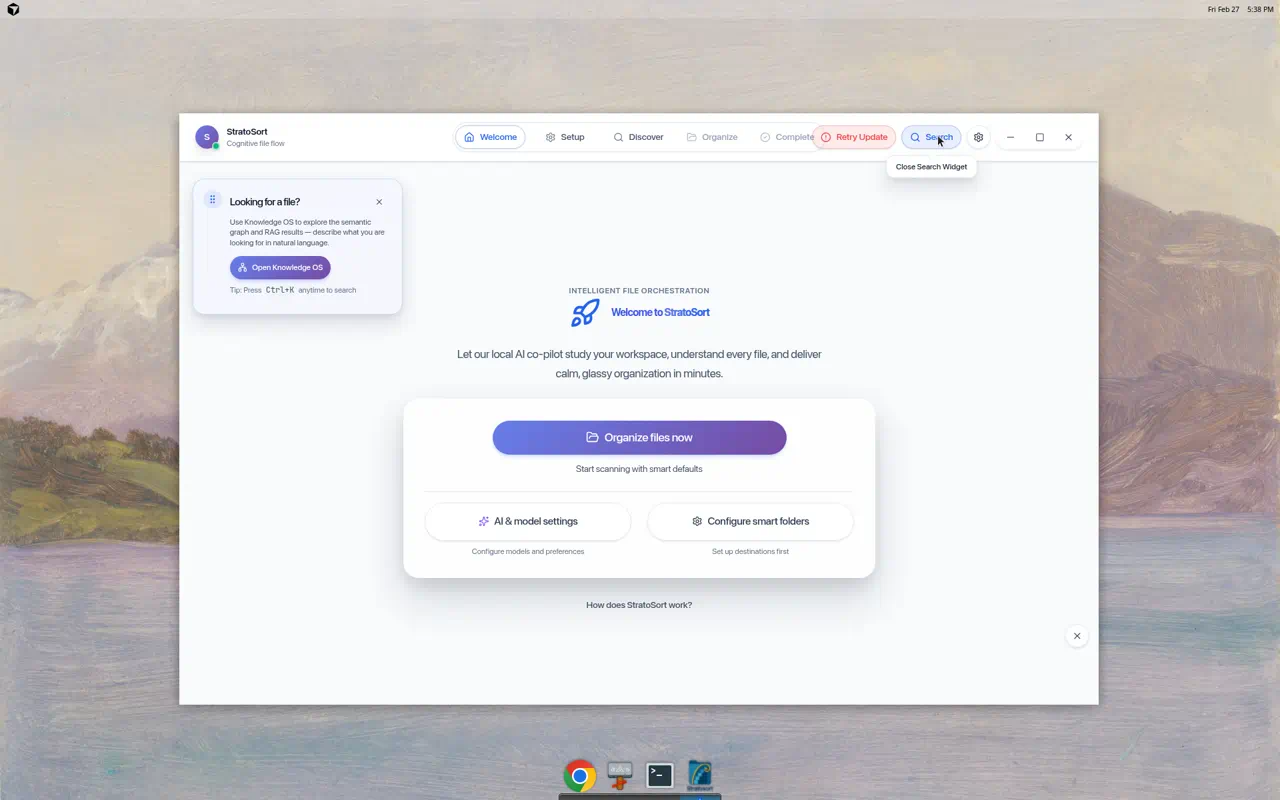
The widget provides:
- Quick explanation of Knowledge OS capabilities
- Open Knowledge OS button to launch the full interface
- Keyboard shortcut: Ctrl+K from anywhere in the app
Knowledge OS Full Interface
After files are analyzed and embedded, Knowledge OS shows indexed content:
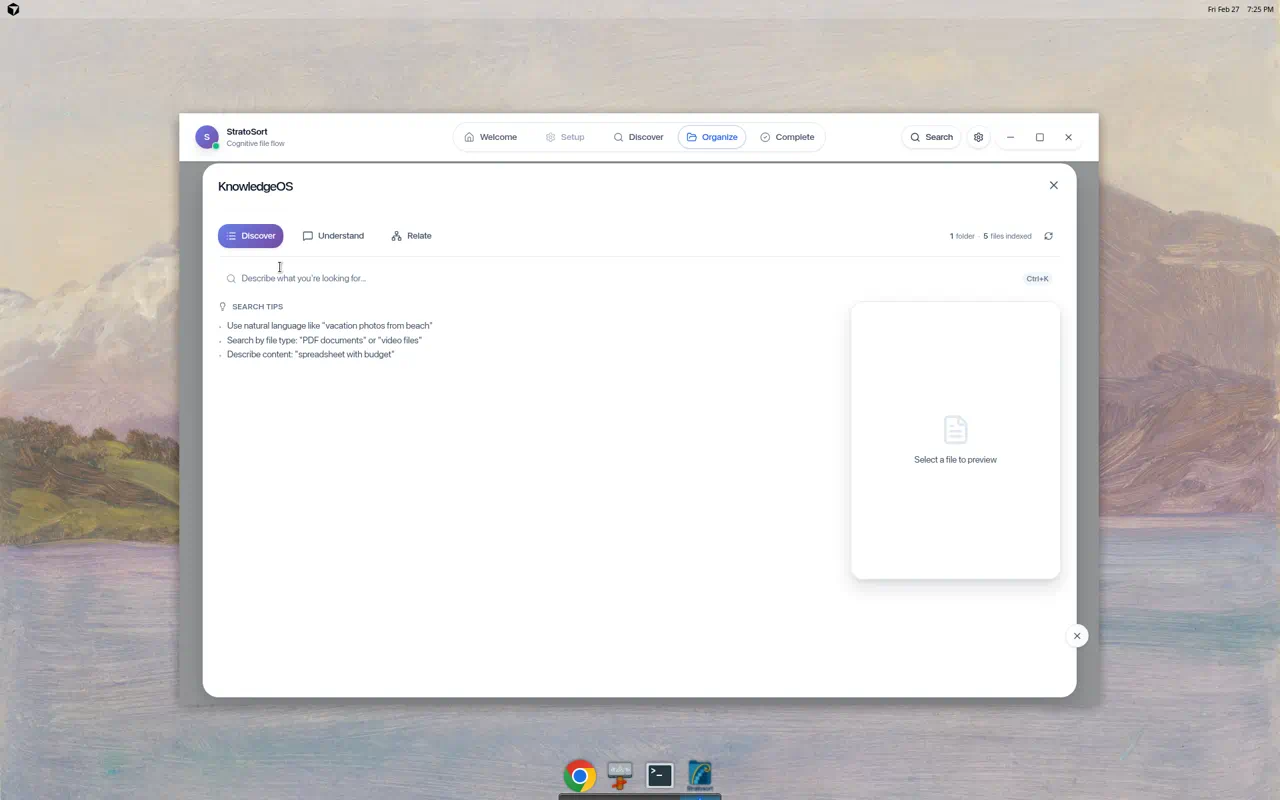
The status bar shows “1 folder · 5 files indexed” confirming embeddings are built. Search tips guide users on natural language queries.
Searching for Files
Type a keyword or natural language description in the search bar:
Keyword search — “invoice”:
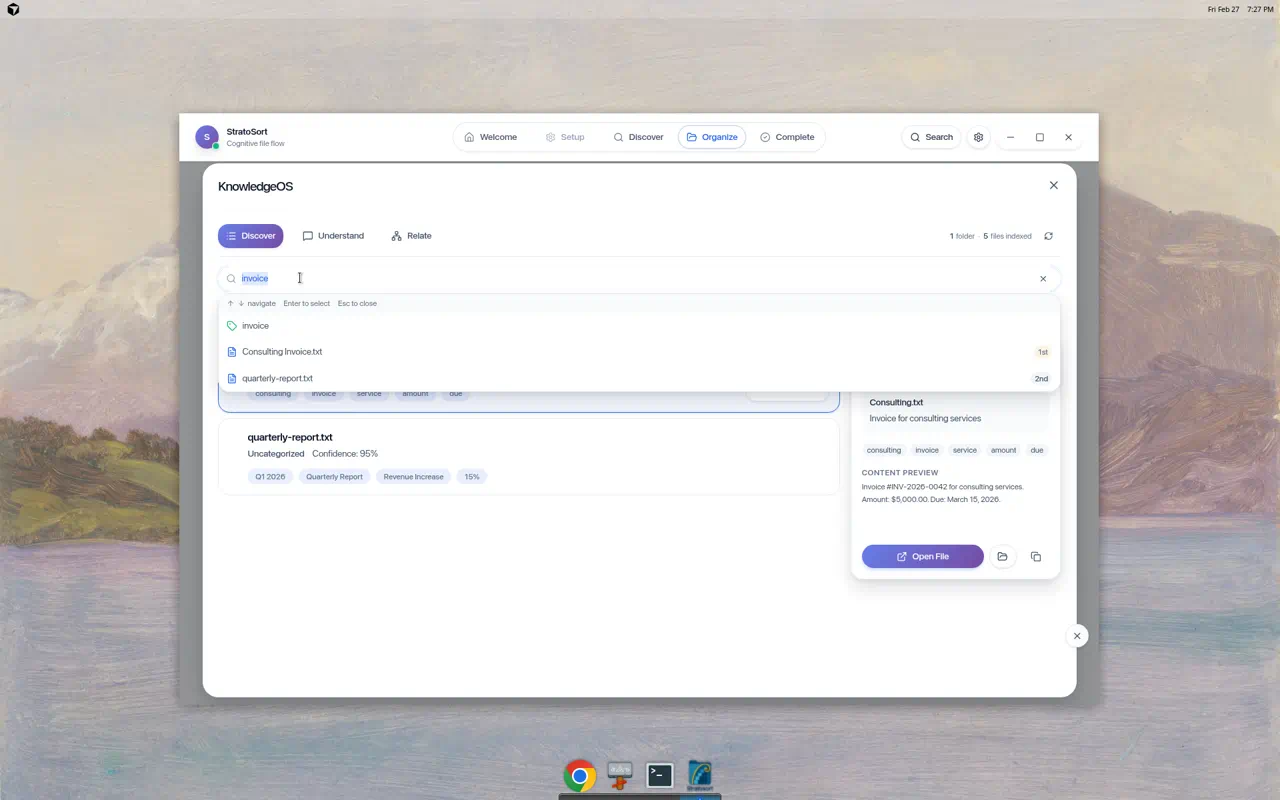
- Found “Consulting Invoice.txt” with 100% confidence
- Tags extracted: consulting, invoice, business, consulting services, amount, due, March 15 2026
- File preview shows full content and path
- Action buttons: View in Graph, Ask AI, filter by Type
Natural language search — “meeting notes about product planning”:
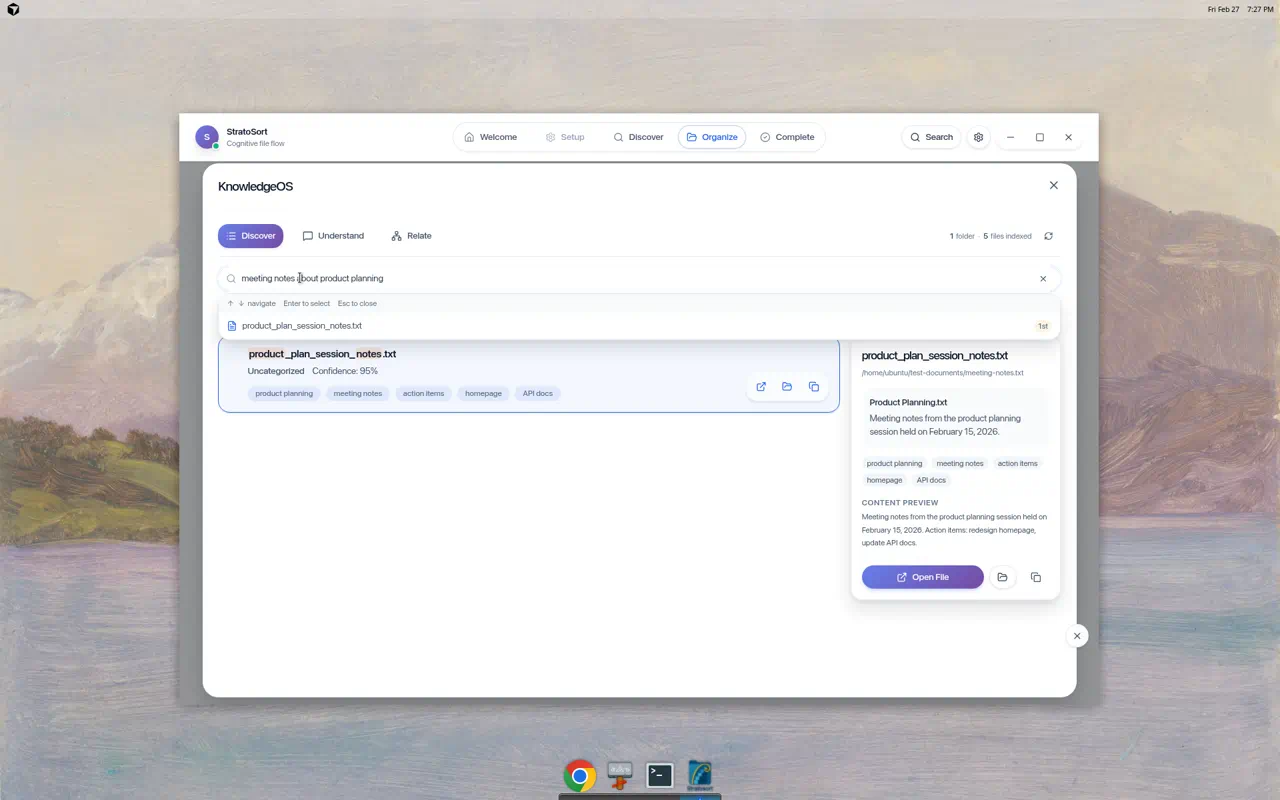
- Found “product_plan_session_notes.txt” with 95% confidence
- Tags: product planning, meeting notes, action items, redesign homepage, update API docs
- Full content preview with original file path
- Open File button to launch the file directly
Discover Tab (Default)
- Search bar — Describe what you’re looking for in natural language
- Results list — Files ranked by semantic relevance with confidence scores
- File preview — Content preview, tags, and actions on the right
- Status indicators — Folder count and indexed file count
- View in Graph — Visualize relationships between search results
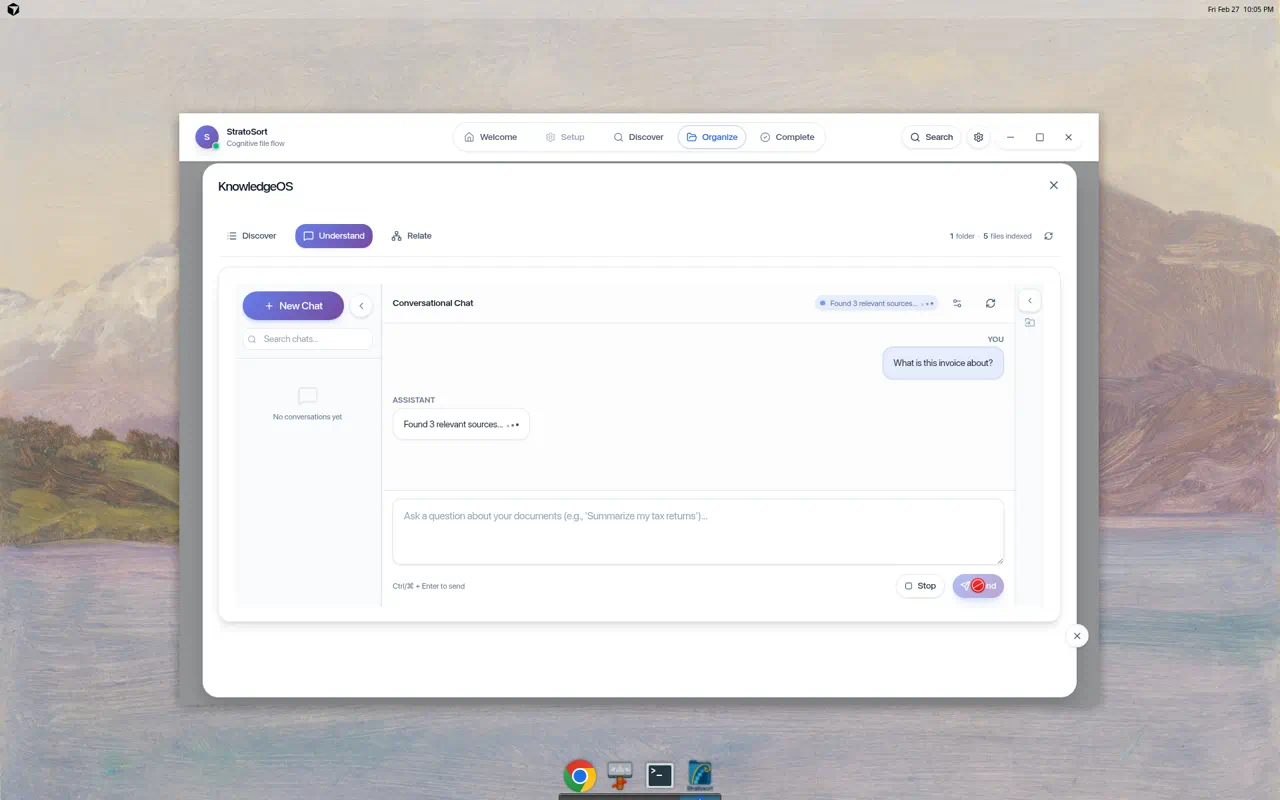
Understand Tab — AI Conversational Chat
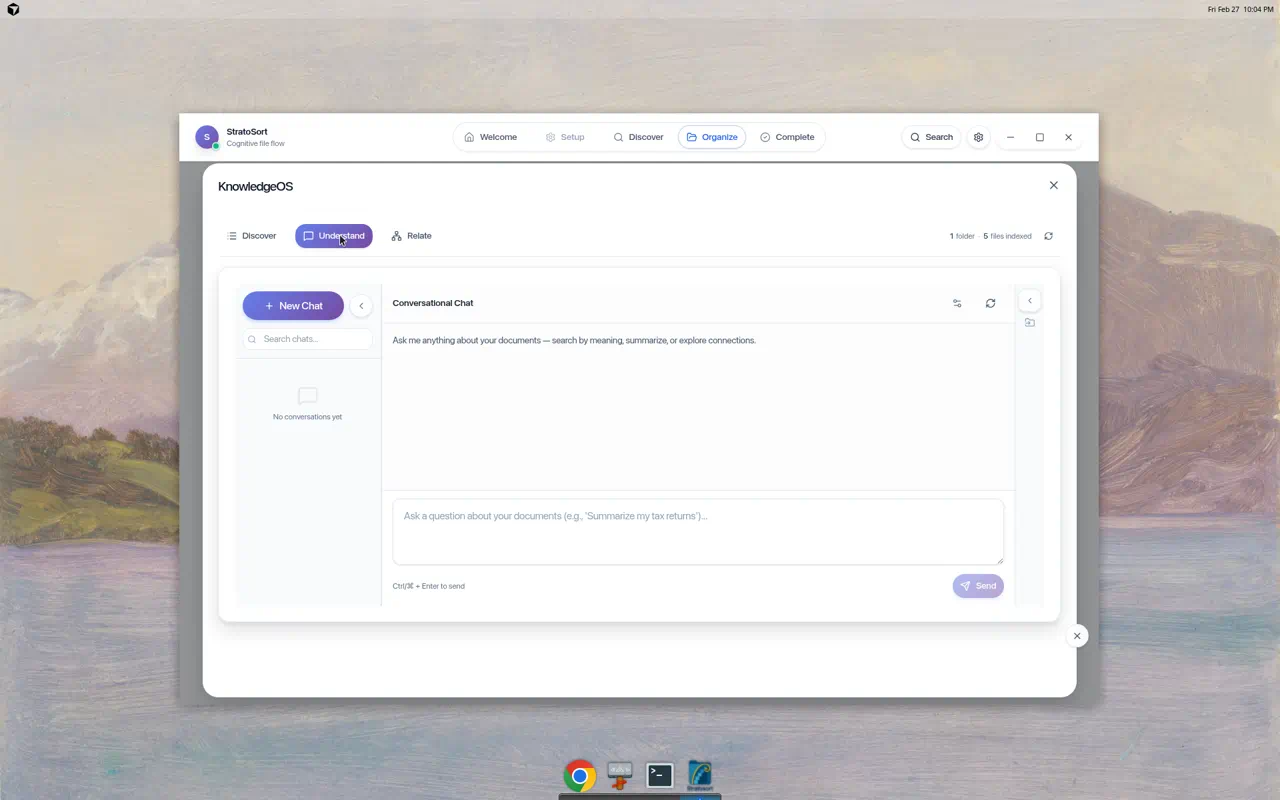
The Understand tab is a RAG (Retrieval-Augmented Generation) chat interface for asking questions about your documents in natural language.
Features:
- New Chat button to start a conversation
- Search chats to find past conversations
- Chat input — “Ask a question about your documents (e.g., ‘Summarize my tax returns’)…”
- Ctrl+Enter to send messages
When you ask a question, the AI:
- Searches your indexed documents for relevant sources
- Shows “Searching documents…” then “Found N relevant sources…”
- Generates a contextual answer using the matched content

Relate Tab — Knowledge Graph Visualization

The Relate tab provides an interactive Knowledge Graph for exploring relationships between your documents. The interface has three panels:
Left Panel — Graph Controls:
- Current graph stats (Nodes, Links, Filters)
- Insights — AI-generated organizational analysis
- Add to Graph — Search and add files to the visualization
- Explore / Actions / Advanced sections
Center — Graph Canvas:
- Interactive node-link diagram with clusters
- Clusters On/Off toggle
- Zoom (+/−) and pan controls
- Double-click clusters to expand into individual files
Right Panel — Legend & Node Details:
- Node type legend: Cluster (orange), File (blue), Query (purple)
- Connection types: Shared Tags, Same Category, Content Match, Vector Similarity
- File category colors: Documents, Images, Audio, Spreadsheets, Code, Videos
- Cluster confidence indicators
Cluster Exploration
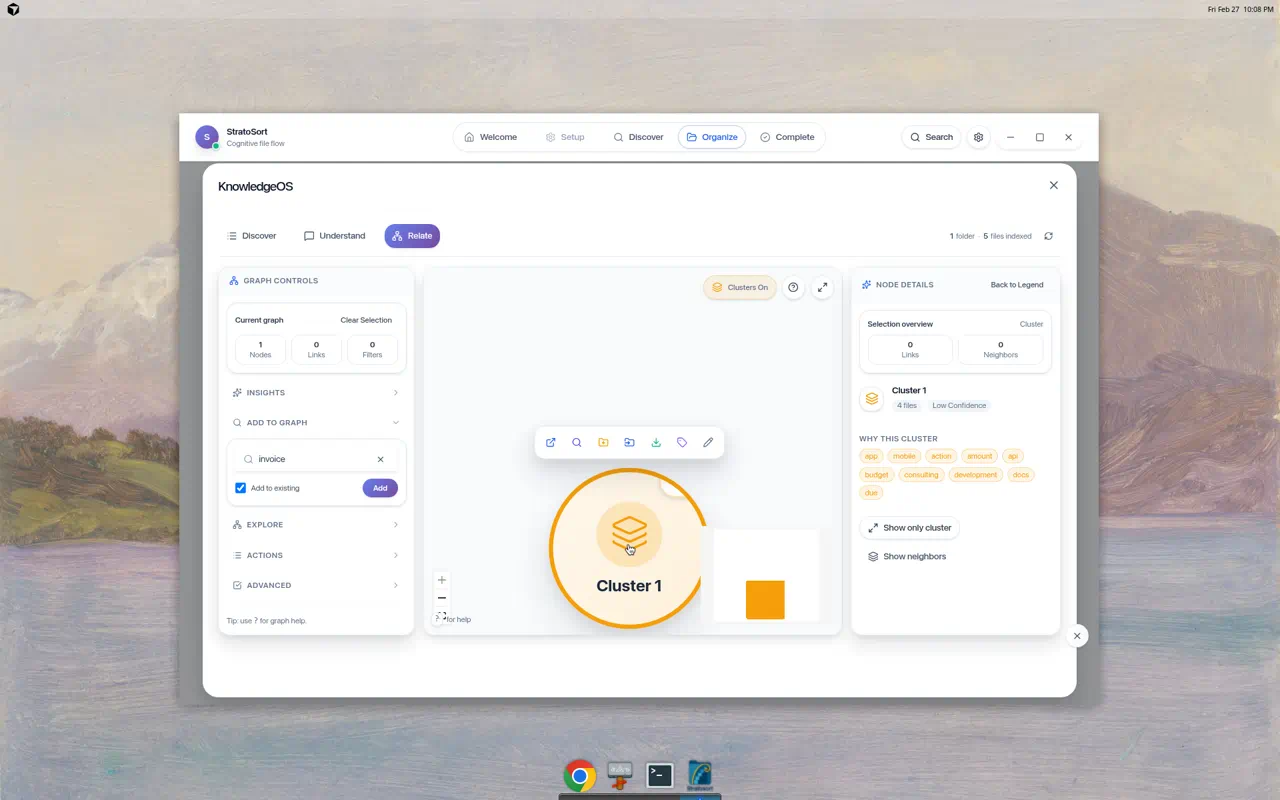
Clicking a cluster shows:
- File count and confidence level
- WHY THIS CLUSTER — Common tags/themes across files
- WHY CONNECTED — Per-file connection reasons (Related content, Similarity connection)
- Show only cluster / Show neighbors buttons
Expanded Cluster View

Double-clicking a cluster expands it to show individual file nodes with relationship edges. The tooltip reads “4 related files. Right-click cluster to organize them.”
Graph Insights
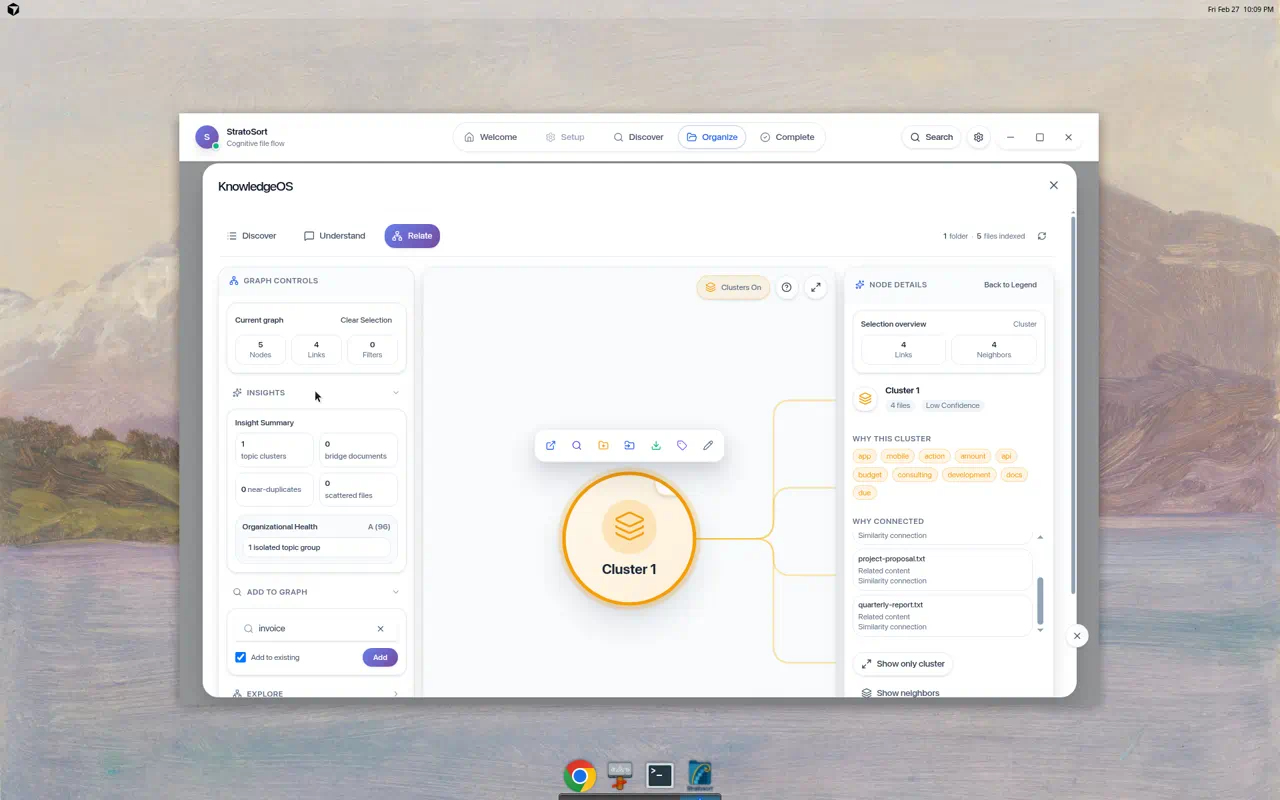
The Insights panel provides organizational health metrics:
- Topic clusters count
- Bridge documents — files connecting different topic areas
- Near-duplicates — potential duplicate files detected
- Scattered files — orphan files without clear grouping
- Organizational Health score (A through F, with percentage)

Building the Search Index
Knowledge OS requires embeddings to function. Embeddings are generated automatically during analysis when “Embedding Timing” is set to “During analysis” (the default). Two manual rebuild options are also available:
- Build Folder Embeddings — Index files in Smart Folders
- Build File Embeddings — Index all analyzed files
8. Settings — Full Reference
Click the gear icon (⚙) in the navigation bar to open Settings. The panel is organized into six collapsible sections.

8.1 AI Configuration
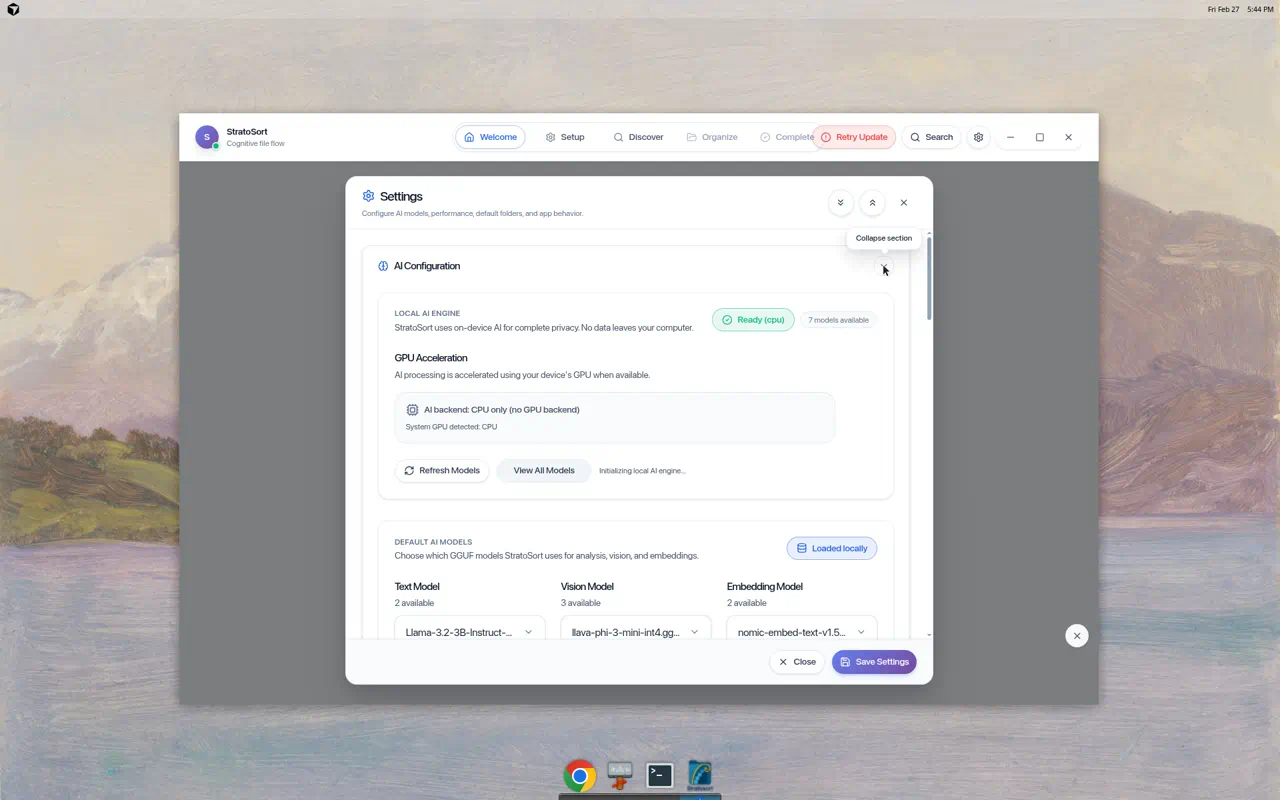
Local AI Engine
- Status badge — Shows “Ready (cpu)” or “Ready (gpu)” with model count
- GPU Acceleration — Toggle between CPU-only and GPU-accelerated inference
- Refresh Models / View All Models — Manage available GGUF model files
Default AI Models
- Text Model — The LLM used for document analysis (e.g., Qwen, Llama)
- Vision Model — The model used for image analysis (e.g., LLaVA)
- Embedding Model — The model used for vector search (e.g., Nomic Embed)
Model Management
Download additional GGUF models by entering the exact filename from the model registry.
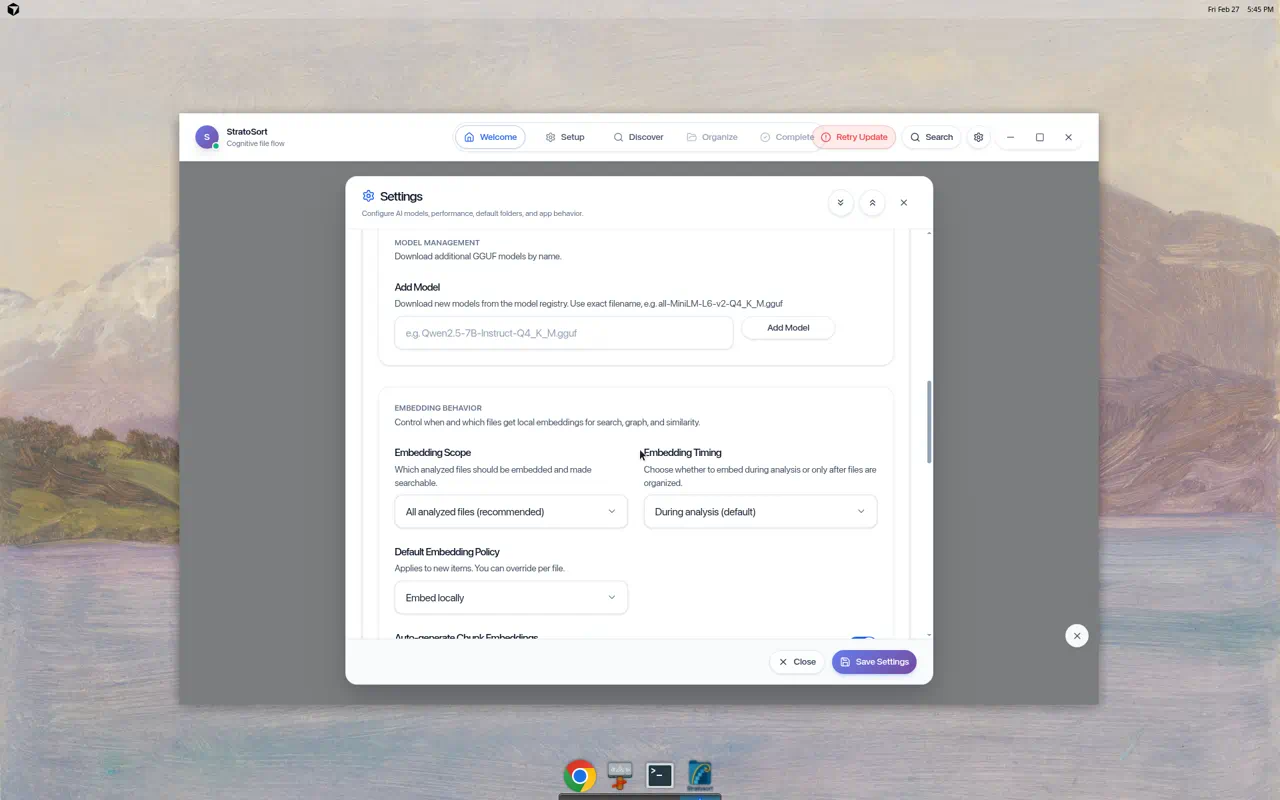
Embedding Behavior
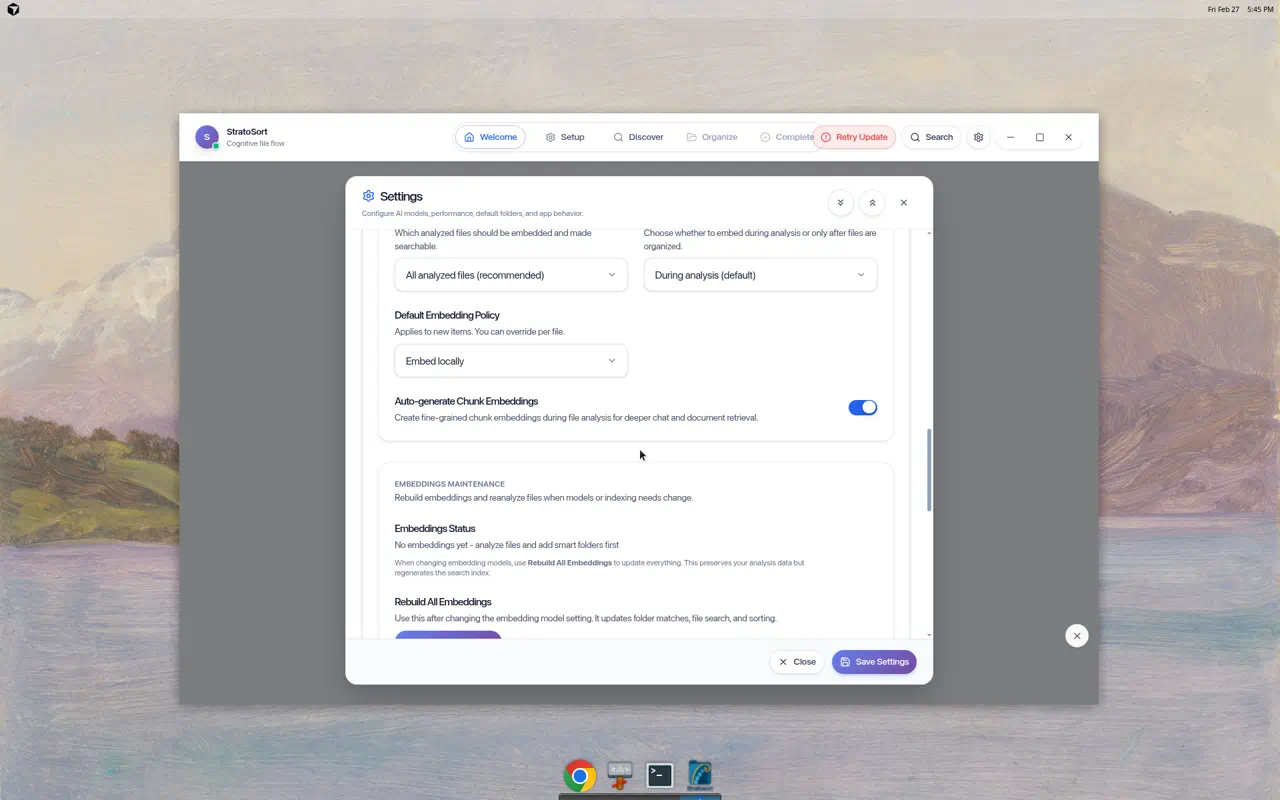
| Setting | Options | Default |
|---|---|---|
| Embedding Scope | All analyzed files, Organized files only | All analyzed files |
| Embedding Timing | During analysis, After organization | During analysis |
| Default Embedding Policy | Embed locally, Skip | Embed locally |
| Auto-generate Chunk Embeddings | On/Off toggle | On |
Rebuild All Embeddings — Use after changing embedding models. Preserves analysis data while regenerating the search index.
8.2 Performance
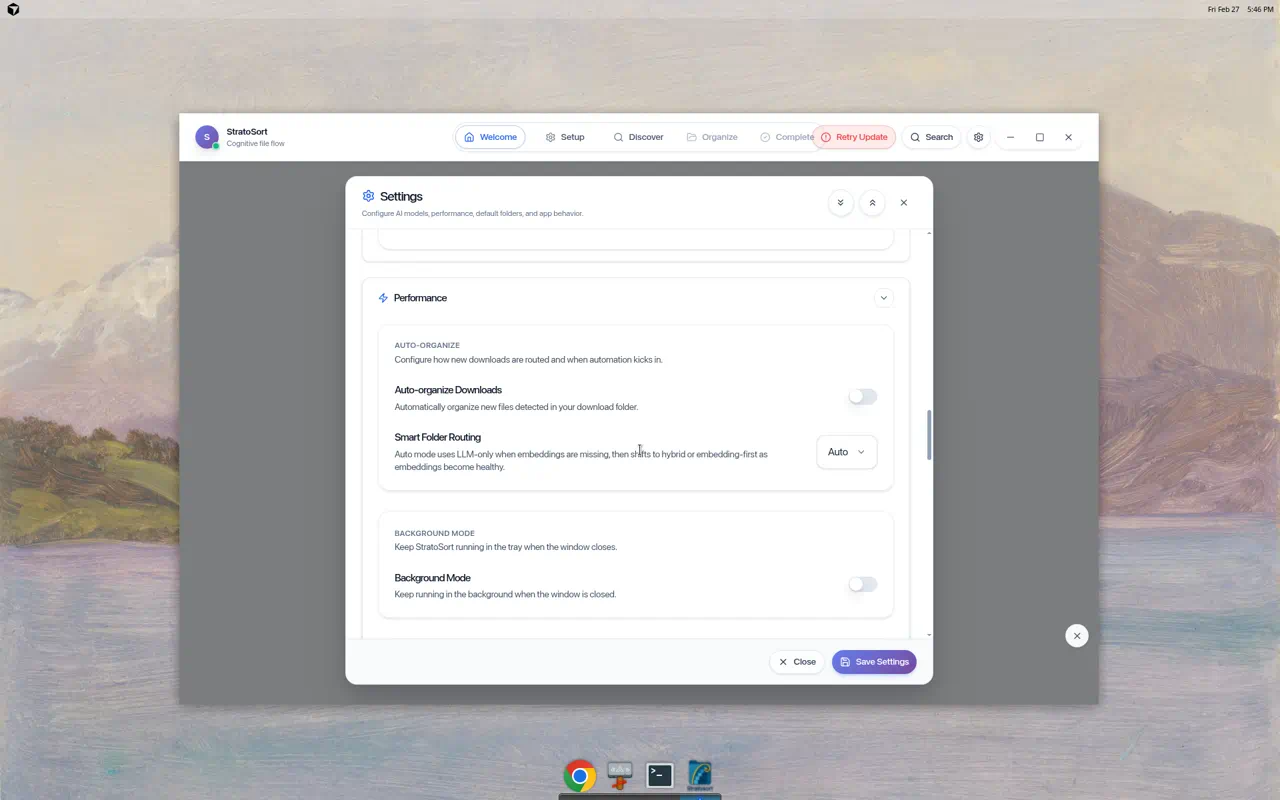
Auto-Organize
- Auto-organize Downloads — Automatically analyze and organize new files in your Downloads folder
- Smart Folder Routing — Choose routing strategy:
- Auto (starts LLM-only, shifts to hybrid as embeddings build)
- LLM-only
- Embedding-first
- Hybrid
Background Mode
- Background Mode — Keep StratoSort running in the system tray when the window closes
Processing Limits
- Concurrent Analysis — Maximum simultaneous file analyses (default: 1)
- Max file sizes — Separate limits for general files (100 MB), images (100 MB), and documents (200 MB)
Graph Retrieval

- Enable Graph Expansion — Use relationship edges to pull related files into search results
- Graph Expansion Weight — Slider (0–100%) controlling how much graph neighbors influence ranking (default: 20%)
- Graph Neighbors Limit — Maximum neighbor files per query (default: 120)
- Contextual Chunk Expansion — Use adjacent chunks for more context
8.3 Default Locations
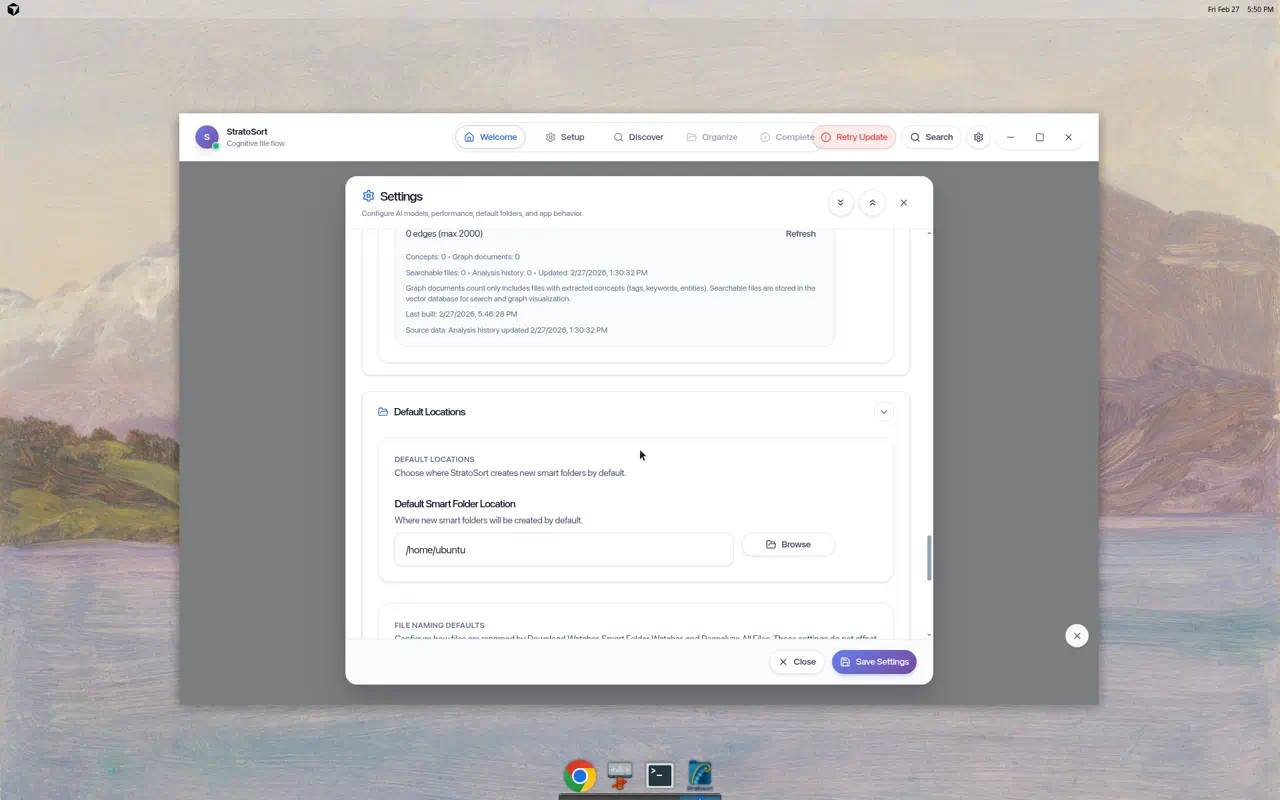
- Default Smart Folder Location — Base path where new Smart Folders are created (default: home directory)
- Browse button — Select a different base path
File Naming Defaults
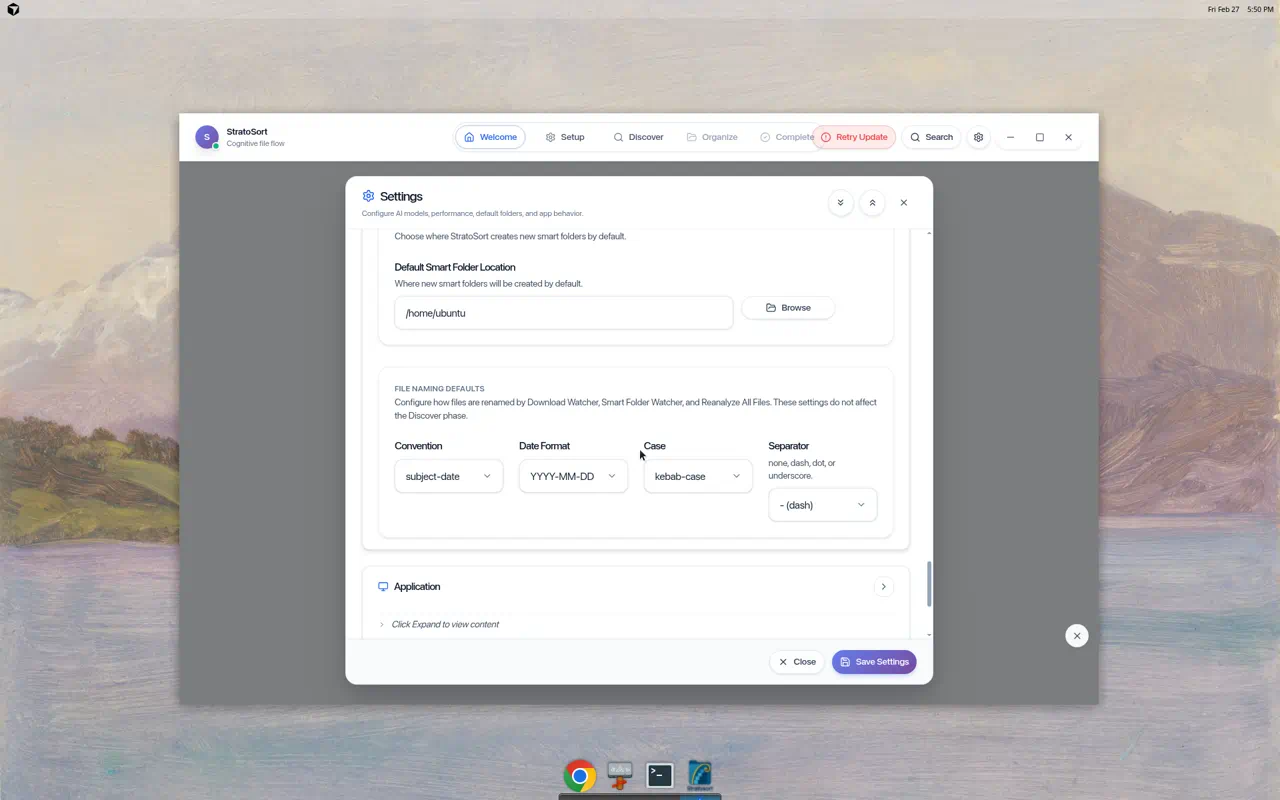
Controls how files are renamed by Download Watcher, Smart Folder Watcher, and Reanalyze All Files. Same options as the Naming Strategy modal in Discover.
8.4 Application
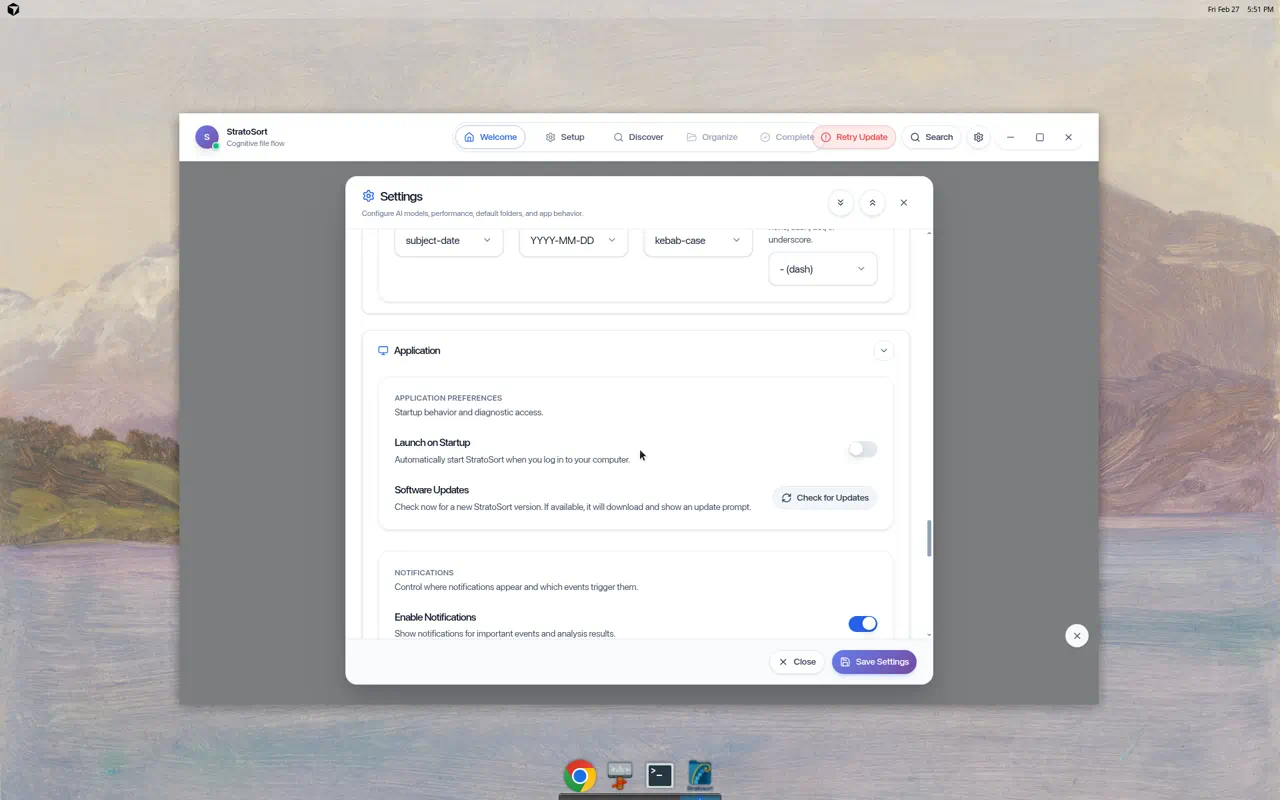
Application Preferences
- Launch on Startup — Auto-start StratoSort when you log in
- Software Updates — Check for new versions with one click
Notifications
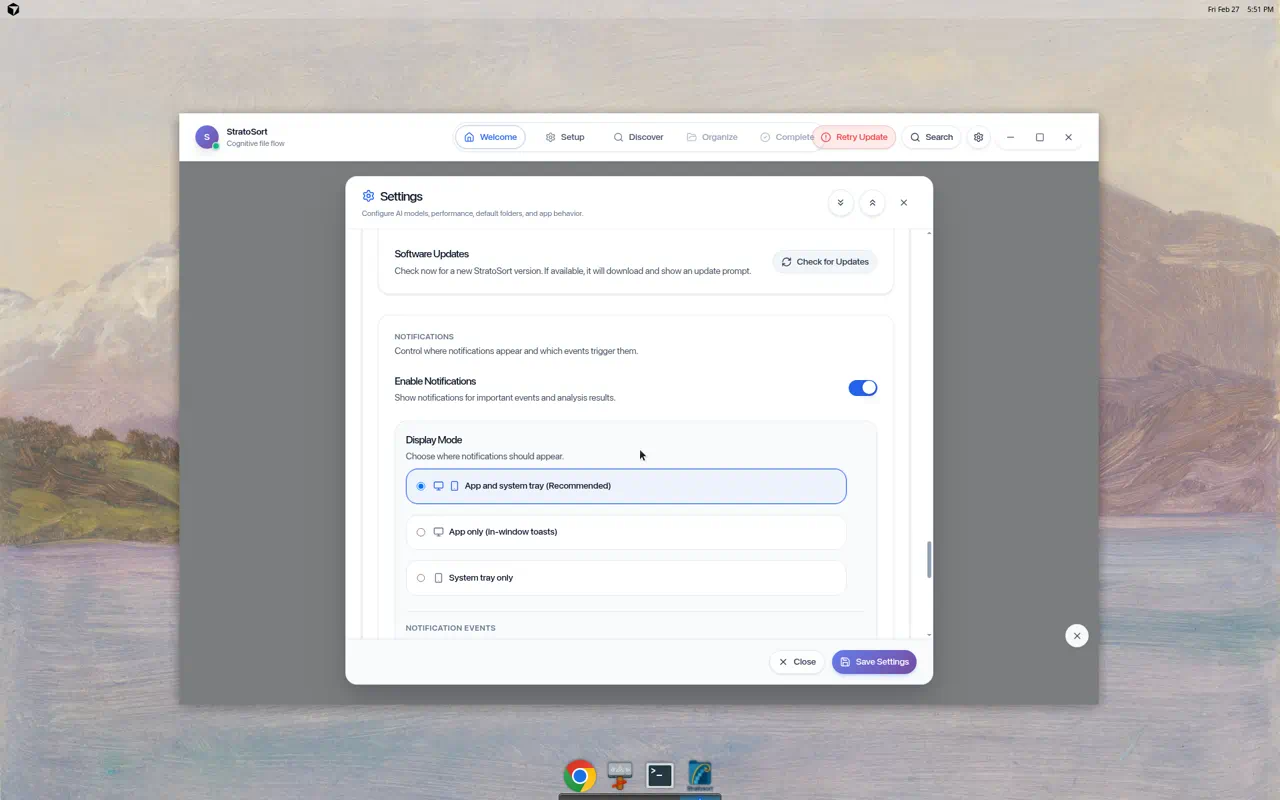
- Enable Notifications — Master toggle
- Display Mode:
- App and system tray (Recommended)
- App only (in-window toasts)
- System tray only
- Notification Events:
- Auto-analyzed files — Notify when smart folder/download watchers analyze files
- Low confidence files — Notify when confidence is below the auto-organize threshold
Settings Backup & Restore

- Create Backup — Save current settings to backup history
- Export to File — Export settings as a portable file
- Import from File — Restore settings from an export
- Available Backups — List of timestamped backups with restore and delete actions
8.5 Analysis History
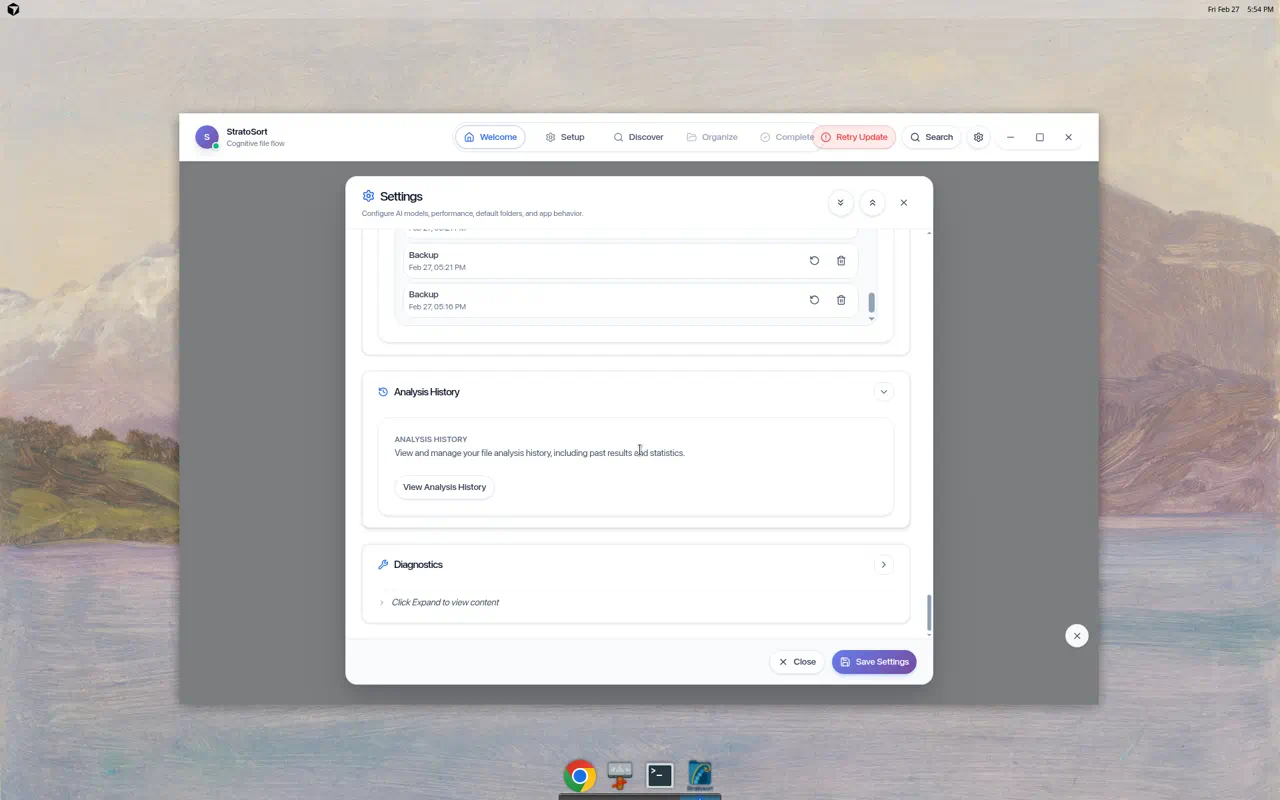
- View Analysis History — Opens a viewer showing past analysis results and statistics
- Useful for reviewing what the AI detected and how files were categorized
8.6 Diagnostics
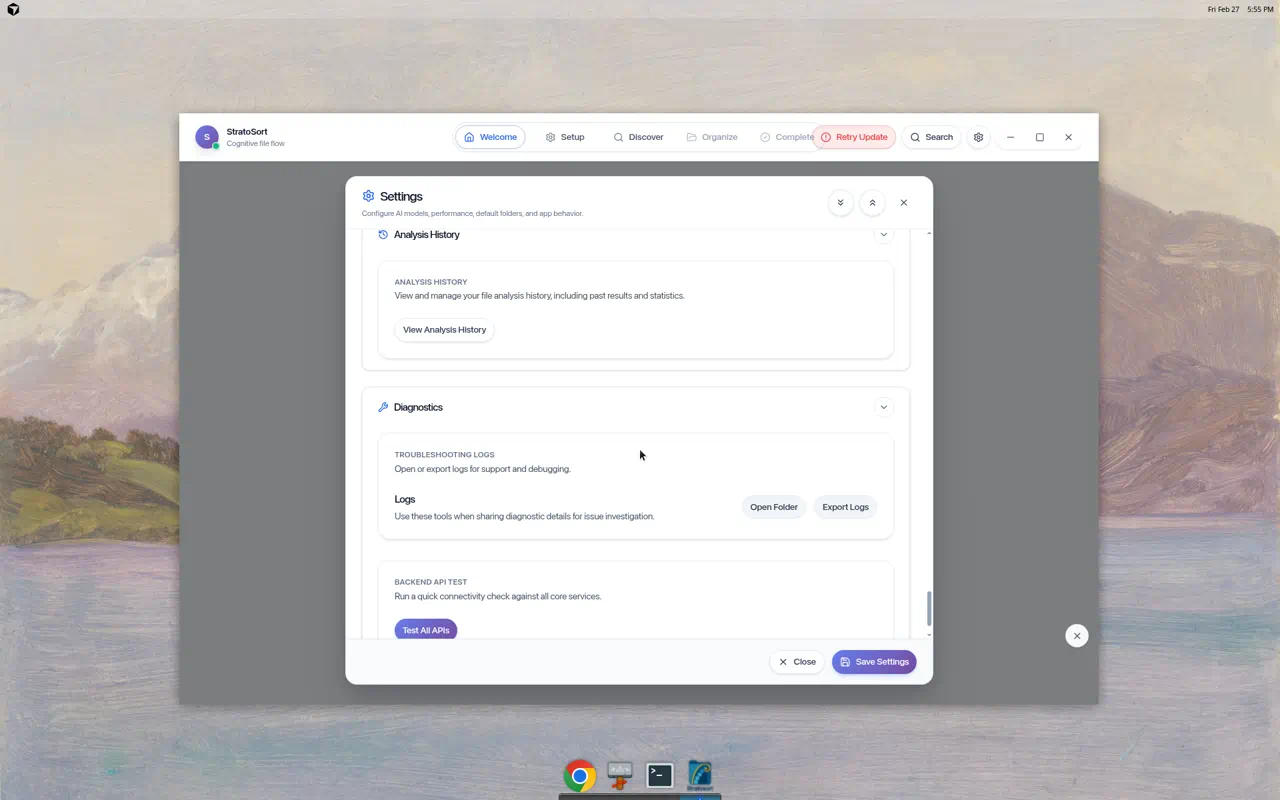
Troubleshooting Logs
- Open Folder — Opens the log directory in your file manager
- Export Logs — Creates a log bundle for support tickets
Backend API Test
- Test All APIs — Runs connectivity checks against all core services (LLM, vector DB, file system, etc.)
9. Videos
Here are some end-to-end walkthroughs showing real user interactions:
1. Welcome & Setup Walkthrough
2. Discover Phase & Analysis
3. Organize & Knowledge OS Demo
4. Knowledge OS All Tabs Complete
Linux-Specific Notes
Running the AppImage
# Make executable
chmod +x StratoSortCore-X.X.X-linux-x86_64.AppImage

# Launch
./StratoSortCore-X.X.X-linux-x86_64.AppImage
Models Directory
Models are stored in ~/.config/StratoSort Core/models/. The app creates this directory
automatically and downloads models on first launch.
Settings Location
Application settings are stored in ~/.config/StratoSort Core/settings.json.
System Tray
On Linux, Background Mode places StratoSort in the system tray. Requires a tray-compatible desktop environment (GNOME with AppIndicator, KDE, XFCE).